This post is the second part of the series about Kubernetes. In the first part, we introduced the K8s and its basic concepts.
Before you start creating services or scaling apps, it’s essential to understand the core components of Kubernetes. This post walks you through pods, containers, and deployments—what they are, how they work, and how they come together to keep your apps running smoothly.
Local Setup
To taste K8s, you do not need access to some fancy remote platform. You can test and play with it on your own machine. Right now, there are a lot of solutions that can help you run K8s locally:
- Docker Desktop. You need to go into settings and enable Kubernetes.
- Rancher Desktop. A similar solution to Docker Desktop, except the Kubernetes cluster, is already enabled.
- minikube. Use CLI to choose the K8s setup.
- k3d
- Colima, this is the one I use.
As you do not need any special setup, I suggest you use Rancher, Docker desktop, or k3d. Both of them will run one node K8s.
You’ll need a terminal application and kubectl.
The kubectl is a command line tool for communicating with the K8s cluster. Check
how to install kubectl based on your OS.
Containers: The Atoms
If you’re familiar with Docker, you already know what containers are. They are lightweight, portable software packages that contain your app with everything it needs to run.
If not, imagine a container – a tiny, self-contained unit that packages up your application’s code, runtime, system tools, and settings. These little champs are like the building blocks of Kubernetes, allowing you to run multiple isolated applications on a single host. They are light and portable software packages that are perfect for the fast-paced world of cloud computing. You can run containers locally using Docker:
docker run -d -p 8080:80 nginx
This command pulls the Nginx image and runs it in a container, mapping port 8080 on your machine to port 80 in the container. Simple. But K8s doesn’t manage containers directly. Instead, it groups them into pods.
Pods
A pod is a group of one or more containers that are deployed together and share storage (like a shared volume for configuration files). These guys act as the fundamental unit of deployment in Kubernetes. They are like a micro-service squad, working in unison to deliver specific functionality.
Let’s create a simple pod:
apiVersion: v1
kind: Pod
metadata:
  name: my-first-pod
spec:
  containers:
    - name: my-container
      image: nginx
      ports:
        - containerPort: 80
Take the above yaml and save it in the file named pod.yaml. Apply it with:
kubectl apply -f pod.yaml
The above configuration tells K8s to create a pod named my-first-pod. Under its name, run
one container named my-container. The image for this container should be nginx, and nginx listens
on port 80.
You can check the pod status with:
❯ kubectl get pods
NAME           READY   STATUS              RESTARTS   AGE
my-first-pod   0/1     ContainerCreating   0          4s
When you apply a manifest, you tell the K8s what resource to create. Then, it needs to do several things, like finding the node on which the pod will be scheduled, downloading the container image, etc. Once everything is fine and the container is up and running, you will see:
❯ kubectl get pods
NAME           READY   STATUS    RESTARTS   AGE
my-first-pod   1/1     Running   0          30s
Manifests
The yaml above represents the K8s yaml configuration of a pod. As we go further, you’ll see that other K8s components have similar configurations:
apiVersion, API versionkind, kind of resource(K8s component)metadata, component metadataspec, resource specification for component These are mandatory.
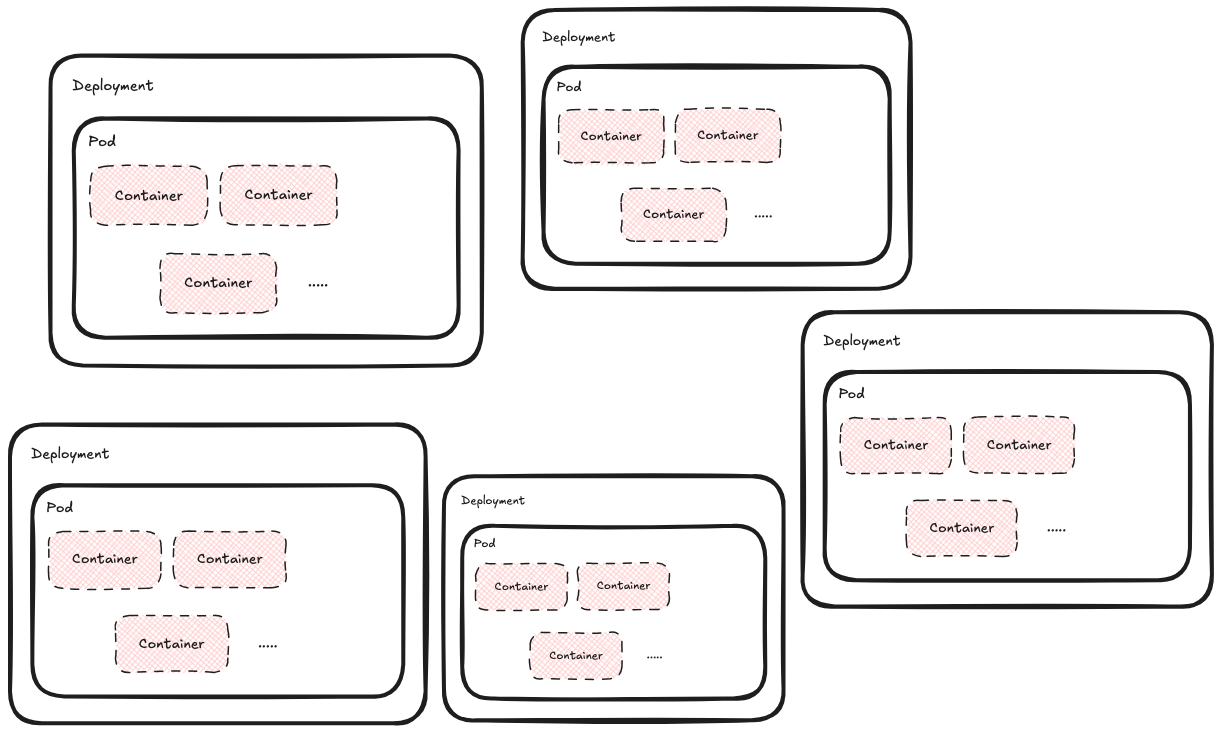
Deployments: The Glue That Holds It All Together
Pods are ephemeral. If a pod dies, Kubernetes won’t automatically replace it. To fix that, we have Deployments. Deployments are the masterminds behind managing the lifecycle of your pods. They dictate how many replicas of a pod should be running and ensure that your application remains up and running even if individual pods fail. Think of them as the self-replicating robots from some sci-fi novel, constantly working to maintain the desired state of your application. Deployments also enable rolling updates and rollbacks, making them essential for maintaining application stability.
Example:
apiVersion: apps/v1
kind: Deployment
metadata:
  name: my-deployment
spec:
  replicas: 3
  selector:
    matchLabels:
      app: my-app
  template:
    metadata:
      labels:
        app: my-app
    spec:
      containers:
        - name: my-container
          image: nginx
          ports:
            - containerPort: 80
Save the manifest above in the deployment.yaml file and apply it:
kubectl apply -f deployment.yaml
Check its status:
❯ kubectl get deployments
NAME            READY   UP-TO-DATE   AVAILABLE   AGE
my-deployment   3/3     3            3           7s
This time, we have 3/3 ready pods corresponding to the replicas: 3 in the deployment manifest.
If one pod is terminated, the K8s will automatically create a new one, ensuring stability.
Wrapping
So, when working with K8s, we are packaging our service in a container. Then, we can tell the K8s to run it in a pod. But if, for some reason, that pod dies, it will not be replaced by another instance. That is why we create deployment, which will ensure we always have the desired number of pods up and running.
To be precise, deployment itself is not directly responsible for keeping the desired number of pods alive. It will create a new component,
ReplicaSet, which is responsible for the desired number of pods. But, as the user, you will work with deployment, not replicas.
Next time, we see how to expose your services to the other services in the K8s cluster and the outside world.